Jailbreak and Unlock iPhone firmware 2.1
Hi there, sorry for the late posting, as you may have mentioned, I was on holidays.
I was in NYC, the City that never sleeps, the Big App… What ? Old news ? Hmm okay
Hi there, sorry for the late posting, as you may have mentioned, I was on holidays.
I was in NYC, the City that never sleeps, the Big App… What ? Old news ? Hmm okay
Just back from my little trip to NYC, I love the City, it rocks !
Imagine my frustration when I wanted to send a sms to my homies, and it didn’t work !
Wtf ! Hopefully, the fix is simple, you need to configure the sms center number.
Read more, click link below…
First you need to be sure you have the right sms center number configured.
To read it, dial the following sequence : *#5005*7672# and hit call.
You should get similar message:
Setting Interrogation Succeeded
Service Center Address
+32495002530
The number you see is valid for Mobistar operator in Belgium.
You need to check with your operator to get the right number.
Once you got the right sms center number, you gotta put it in your iPhone.
Make sure you encode the number with the ‘+’ sign in front and not ‘00′.
I had it configured with ‘00′ and it didn’t work.
Ok now let’s suppose that your sms center number is +32495002530,
you will need to dial the following sequence : **5005*7672*+32495002530#
and hit call. You should get the following message :
Setting SucceededService
Center Address
No Address
Tip: To dial the ‘+’ sign, hold the ‘0′ until it prints the ‘+’.

The VMWare team has released some days ago the second beta for VMWare Fusion 2.0.
This new beta brings tons of new features on the table like Unity 2.0, Multiple Snapshots,
Better Video and Graphics, and last but not least support for more client OSs,
including Leopard Server !!!
Virtualizing Mac OS X Server inside Mac OS X sounds really interesting, specially for atv4mac. People running Leopard will be glad to install Mac OS X Tiger inside a VMWare to run atv4mac! But we need to do a little hack to VMWare Fusion since it only supports Mac OS X SERVER virtualization.
See more details around the hack, click the link below
The following items are required to start the hacking process:
– Retail DVD of Mac OS X Tiger (or Leopard)
– VMWare Fusion Beta 2 installed
Verify you installed VMWare Fusion Beta 2.
Then Open a Terminal window and type the following commands:
sudo bash
cd "/Library/Application Support/VMware Fusion/isoimages"
mkdir original
mv darwin.iso tools-key.pub *.sig original
perl -n -p -e 's/ServerVersion.plist/SystemVersion.plist/g' < original/darwin.iso > darwin.iso
openssl genrsa -out tools-priv.pem 2048
openssl rsa -in tools-priv.pem -pubout -out tools-key.pub
openssl dgst -sha1 -sign tools-priv.pem < darwin.iso > darwin.iso.sig
for A in *.iso ; do openssl dgst -sha1 -sign tools-priv.pem < $A > $A.sig ; done
exit
Your VMWare Fusion is now hacked to allow installation of Mac OS X Tiger/Leopard.I am looking for a Tiger Retail DVD, please contact me if you can help.
There are no Intel Tiger Retail DVD, doh !
Need to hack the Tiger Install DVD that came with your mac !

WinPwn 2.5 does it all! It Pwns, QuickPwns in basic or expert mode.
This is the ultimate tool for windows users, and it does support the latest 2.0.2 firmware!
WinPwn 2.5 features:
– QuickPwn Support for 2.0/2.0.1/2.0.2
– Root partition resize support
– Installer support
– Basic / Expert modes
– Wizard style interface
– Automatic updater
– Support for WinXP and Vista 32/64bit.
Click on the link below to access download links.

Sure you can haz it!

The long awaited QuickPwn for mac is finally there!
We provided previously a tutorial for mac users to use QuickPwn for Windows in Parallels.
With this new release, it is even more simple! Just Download the torrent below:

Downloaded 1220 times
Some of you might still wonder what’s the difference between PwnageTool and QuickPwn.
QuickPwn is a tool that uses a totally different way than PwnageTool to Jailbreak.
QuickPwn should be used by all 2G iPhone users without any problem, even those who need
to unlock their iPhone. For the 3G iPhone users, it’s a bit different; we recommand that
you do not use QuickPwn if you need to unlock your 3G iPhone.
PwnageTool 2.0.3 provides support for iPhone/iPod firmware 2.0.2 5C1, and it contains
Installer.app beta (b6). Also dev team added internationalization support for German (only?).
Windows QuickPwn application contains a revised GUI from Poorlad that has tighter
integration into the the main updated QuickPwn executable which has fixes for YouTube
and provides BootNeuter support for the unlock of 2G iPhones, remember this is still beta
software, use at your own risk.
Still no available version of QuickPwn for mac.
UPDATE : Download links updated with new versions!
If you had problems with PwnageTool or QuickPwn, please re-download them.
QuickPwn (
This new tool is very useful for those who do not need to unlock their iPhone.
It is much quicker than PwnageTool and does not require restoring firmware.
Follow our tutorial to instantly jailbreak your device with QuickPwn.

Warning: If you have a 3G iPhone and you need to unlock it, stay away from this method. It will update the baseband of your iPhone which may render it unlockable in the future when a solution comes out. You have been warned. Only for 3G legit users.
Click on the link above to read the tutorial.
As you might have noticed, the tool is made for windows.
If you are running a mac, get Parallels or VMWare Fusion and install Windows.
You will also need to download firmware 2.0.2 for your device (iPhone 2G, 3G or iPod).
Before you start you need to update your iPhone to the latest 2.0.2 firmware via iTunes.
You will need iTunes 7.7.1, be sure you have the latest iTunes version or it won’t work.
Connect your iPhone to iTunes and sync it first, iTunes will create a backup.
Then you can hit the update button to install the latest 2.0.2 firmware.
Remember QuickPwn will activate (if required) and jailbreak, but not unlock.
Do not use QuickPwn if you need to unlock your iPhone.
Also if you were running *free* cracked iPhone apps, they won’t launch after the 2.0.2 update
until you jailbreak your device with Pwnage. Let’s do this!
Fire up QuickPwnGui120.exe and select your type of device:

Click next and browse to the Apple’s 2.0.2 firmware you downloaded here

Click next once you selected the right firmware (2.0, 2.0.1 and 2.0.2 are supported):

Next select if you want Cydia, Installer and custom logo to be installed :

Click the GO button and follow the instructions in the command-line windows :

If you are running in a virtual machine like me, connect your iPhone to the VM.
I am using Parallels, so I had to click on the usb icon in the lower right corner:

Hit the GO button and you should see a command-line window.
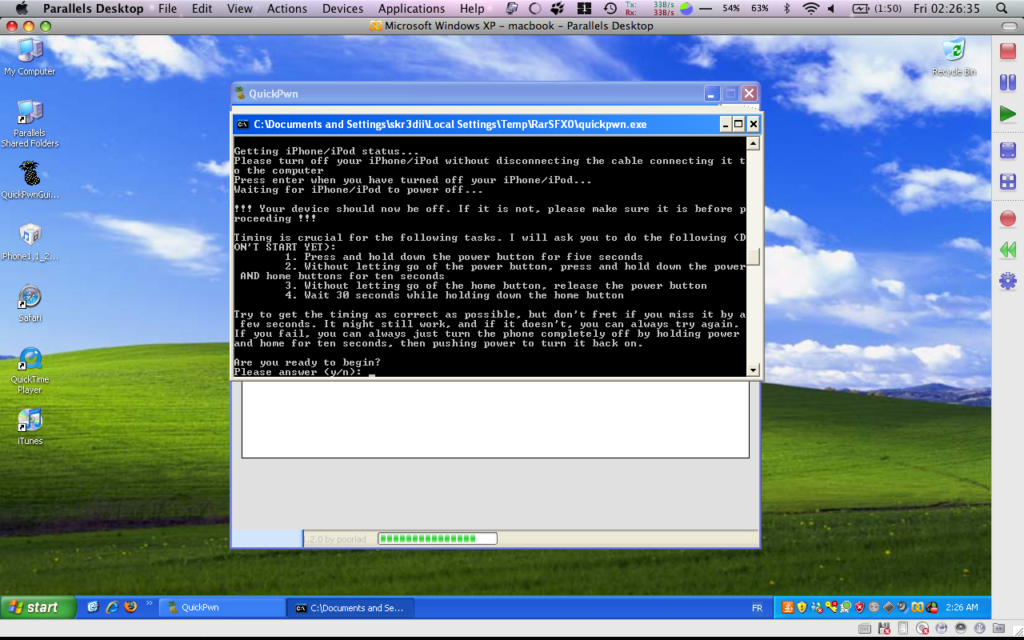
Wait until you get the following message:

Turn off your iPhone and hit enter once it is done. You’ll get this screen :

Next you will need to enter DFU mode, just follow the instructions on the screen above.
You should see that windows detected the phone in DFU mode:

If you are running Windows in a virtual machine, you might be stuck at this screen:

If it happens, just pull out usb cable and plug it back in (ghetto usb reset – thx planetbeing).
Also if iTunes pops up in your mac native OS, just quit it.
The process in the command line window should resume.
Wait until the end, your iPhone should reboot. Do not care about the pineapple logo.
If you choose not to update logos, they won’t be updated, trust me.
Once rebooted your are (h)ac(k)tivated and jailbreaked.
Enjoy!